Main menu:
Auto Tiling in Multimedia Fusion 2 and Clickteam Fusion
Many games contain level editors which allow a player to create unique new levels for their respective games. Some level editors require the user to manually place each object. Others will automatically generate the correct objects after a player places one tile. This tutorial will cover the main aspects of creating such a system; where the user places one tile and the application will auto-generate the correct "tiles".
Quick Links:
Tile
- The object the user places/creates. These objects are usually invisible to the player. The program generates the correct masks from a certain tile.
Mask
- The object the player sees. These objects are created after all sides of a tile are checked.
Detector/Checker
- The object used to test a tile for neighboring tiles. This object should not be the same object as the "Tile" to reduce object scoping complexity.
**Note**
These objects should all be the same size
The concept for auto-tiling is fairly straightforward.
First, a tile needs to be selected. This tile will have a new/updated mask shown above it.
Next, we test each side of the selected tile for other neighboring tiles. In the case of four sided tiles; the top, bottom, left, and right edges will be scanned. If a neighboring tile is not found, all groups involving the specified side will be deactivated; preventing incorrect masks from creation. This scan is repeated until all sides have been scanned.
These groups contain all the possible options for new mask. Initially all the options are open but as side is tested, options are removed. By the end of the test, only one option should remain. The groups are discussed in further detail here.
Finally after all the sides are tested, the appropriate mask will be created from the remaining activated group(s). This process repeats for any and all tiles which updated masks.
Before we go to implement the mechanic, we need to create an appropriate tileset.
This example uses a tileset where the tile has four sides, but the concept works for any given number of sides.
The pictures below show two completed tilesets. These tilesets contain sixteen unique masks. The number of tiles required for a tileset is expressed with the following formula: "< Number of Options Per Tile > ^ < Number of Neighboring Sides Looked At >". In our case, we have 2 options per tile so the formula is "2 ^ < Number of Neighboring Sides Looked At >". So the number of tiles needed when looking at given number of neighboring sides are as follows:
3 sides - 2 ^ 3 = 8 tiles
4 sides - 2 ^ 4 = 16 tiles
5 sides - 2 ^ 5 = 32 tiles
6 sides - 2 ^ 6 = 64 tiles
etc...
After the tileset is completed, you should be able to arrange the tiles smoothly without rough connections between them.
**Note**
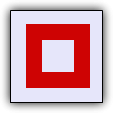
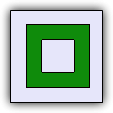
The name of each tile is listed in the below picture. Notice the naming system of the tiles. This system is important and comes back later in the tutorial.


We will use a process of elimination to determine the appropriate mask needed for a certain tile. Each mask will have its own group in the event editor as shown on the right. Each of these groups will initially be enabled/activated when the test for neighbors begins. If a neighbor is not found on a certain side, all groups requiring that side are disabled.
Example:
Suppose we had a tile with two neighbors; one on top side and one on the right side. The top side is checked and a neighbor is found. The left side is checked but no neighbor is found. As such, all groups requiring a left neighbor are disabled which are as follows: Surrounded (has neighbors on all sides), Top Wall (does not have a neighbor only on the top side), Bottom Wall (does not have a neighbor only on the bottom side), Right Wall (does not have a neighbor only on the right side), Horizontal Tube (neighbors on the left and right). Top Right Corner (neighbor on the left and bottom), Bottom Right Corner (neighbor on the left and top), and Right Deadend (only neighbor is on the left side)
Afterwards the right side is checked and a neighbor is found. Finally the bottom side is checked but no neighbor is found again. As such all groups requiring a bottom neighbor are disabled which are as follows: Surrounded (has neighbors on all sides), Bottom Wall (does not have a neighbor only on the bottom side), Top Left Corner (neighbor on the right and bottom), Top Right Corner (neighbor on the left and bottom), Vertical Tube (neighbors on the top and bottom), Top Deadend (only neighbor is on the bottom side), Left Wall (does not have a neighbor only on the left side), and Right Wall (does not have a neighbor only on the right side)
After all of the sides have been checked, two possible options may remain; the island mask (has no neighbors) (will always remain) and another mask (will be the correct mask if the tile has any neighbors). Since this method is unable to detect if a tile has no neighbors, we can put the "Island" mask at the end of group. If a mask is created before the "Island" group is reached, disable the "Island" group. Else if no other mask is created, we know the Island mask is the correct mask. Similarly, we must put the "Surrounded" group first since every mask group will be activated if the "Surrounded" group is enabled. Whenever the "Surrounded" group executes, disable all other mask groups.
**Note**
The problem with the island mask can be easily solved by also testing for an overlap. If any overlap is found, disable the island mask group.
Finally, we create the mask, reactivate all groups, and start the process all over again. Now that the correct mask can be determined, let's discuss how to create the mask.

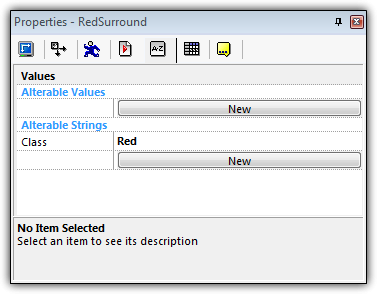
Remember the naming convention shown above? Each mask is named like <Class><MaskType><Direction> such as RedTubeH and FenceCornerBL. This naming convention will be used to make the mask creation simple and easy.
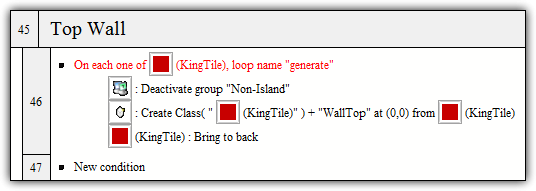
So at this point, we are able to determine which mask should be created. Now we simply need to dynamically create the actual mask! If you are using Multimedia Fusion 2, you must use the Create By Name extension. If you are using Clickteam Fusion, you can use the Create By Name extension or the default Create object. In each group you need create the mask of that corresponds to the group centered on the originating tile. In the below example, all Top Wall masks end with "WallTop." When this group is activated during runtime, the active named "WallTop" will be created and should be centered on the originating tile. Apply this action across each group to complete the mask creation progress.
The class portion of a tile can be changed anytime during runtime. This allows tiles from different tilesets to be used easily. See the tab "Multiple Tilesets" for additional information!